Frequently Asked Questions
Compact Info and How To's
Dimensions: 51cm H x 23cm W x 33cm D
Weight: 8 kgs
Cleaning capacity : for spaces up to 50sqm in area (with a ceiling height of 2.4 meters) and is a recommended option for bedrooms, small living rooms, offices, and classrooms.
For more information on the Compact, click here.
- Your Intellipure Compact DFS Air Cleaning System Unit
- 6-stage prefilter (inside unit)
- Main filter (inside unit)
- Power cord
- User Manual
- Warranty Card
Tip: Before starting up your Intellipure Compact - open the front cover and take off the plastic around the pre-filter. This plastic helps prevent any issues during shipping.
- Carefully remove the unit from the carton.
- Each unit comes equipped with, (1) pre-filter and (1) main filter.
- Before powering on your unit, take off your magnetic front cover by using the two bottom tabs on each side of your unit. Simply pull out and lift.
- Remove the plastic wrap on your pre-filter and insert it back into the unit with the airflow and filter description facing up. The pre-filter is wrapped to ensure freshness.
- Inspect the power cord for damage. If the power cord is damaged, please contact Intellipure’s customer service department to obtain a replacement. If your power cord is intact, you may plug in your unit and enjoy exceptionally pure air!
Reminder - Keep your Compact in a dry and cool place. The unit is a plug-and-play design for indoor use only.
Replacing the Pre-Filter
⚠️ Caution: Always disconnect power to the unit before servicing
- First, make sure all power to the unit is shut off.
- Open the front panel, using the side tabs located on the lower panel, and pull towards you, then lift upwards.
- Remove the 6-stage pre-filter. The prefilter can be cleaned monthly by using a small vacuum cleaner wand.
Based on typical use, we recommend replacing this filter every 6 months.
Replacing the Main Filter
⚠️ Caution: Always disconnect power to the unit before servicing
- First, make sure all power to the unit is shut off.
- Remove the prefilter by using a screwdriver. Remove the 2 screws holding the filter in place.
- Remove and discard the old main filter. Slide the new main filter into place and secure the main filter with the two screws.
- Reinstall the prefilter and the front cover. To reset the DFS indicator, turn the unit to medium speed and press the power button for 5 seconds.
- When the DFS indicator quickly flashes 3 times, the DFS timer is successfully reset.
Based on typical use, we recommend replacing this filter
every 12 months.
Cleaning the High Energy Grid
⚠️ Caution: Always disconnect power to the unit before servicing
- Follow the steps (above) of the filter replacement to remove the filters.
- Replace them if needed. Use a pipe cleaner or small vacuum to gently clean the wires on the high-energy grid.
⚠️ Caution: Always disconnect power to the unit before servicing
- The maintenance schedule is based on the pollution level.
- Filters need to be replaced/cleaned more often if the unit is being used in a heavily polluted environment.
- The following maintenance schedule is recommended for most environments.
-
- Pre-filter - Recommended replacement every 6 months
- Main filter - Recommended replacement every 9-12 months
- High Energy Grid - Clean with a lint-free cloth every 3 months
PureCare by Air Intellipure - for Compact
Under PureCare, Air Intellipure's annual maintenance program, our Technical Support team will thoroughly inspect and clean your Intellipure Compact on a quarterly basis and replace your filters (pre- and main) once within the year, to ensure your unit is always operating at its highest level of efficiency. Enjoy peace of mind that you are always breathing the cleanest, healthiest air possible, in your home or office.
Call us at 0908 895 7873 (mobile/Viber) to sign up for our PureCare program.
Ultrafine 468 Info and How To's
Dimensions : 77cm H x 27cm W x 30cm D
Weight : 12.7 kgs
Cleaning Capacity : Up to 100 sqm area (with ceiling height of 2.4 m). Comes equipped with rollerblade style wheels, making it easy to move from room to room.
For more information on the Ultrafine 468, click here.
1. Your Ultrafine 468 Main Unit
2. Cleanable integrated pre-filter (inside unit)
3. Replaceable VOC pre-filter (inside unit)
4. Main + VOC post-filter Cartridge (inside unit)
5. Power cord
6. User Manual
7. Warranty Card
8. Microfiber cloth
Setting up is as easy as 1-2-3
- Carefully remove the unit from the carton and remove the dust bag covering the unit. The dust bag prevents scratches and damage to the unit during transportation.
- Each unit comes equipped with (1) pre-filter, (1) main filter, and (1) post filter.
- Inspect the power cord for damage. If the power cord is damaged, please contact Air Intellipure’s Technical Support Center to obtain a replacement. Plugin your unit and enjoy exceptionally pure air!
Note: Keep your unit in a dry and cool place. The unit is a plug-and-play design for indoor use only.
Tip: Keep the box and dust bag just in case you move or go on vacation - it's the best way to bring your air purifier from place to place.
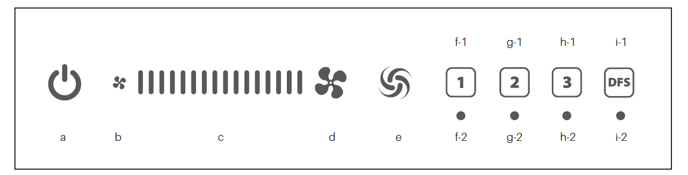
f-1) VOC Pre-filter indicator
f-2) Change VOC pre-filter indicator
g-1) Main filter indicator
g-2) Change main filter indicator
h-1) VOC post-filter indicator
h-2) Change VOC post-filter indicator
i-1) DFS indicator
i-2) DFS deactivation indicator
a) Power button
b) Sleep mode
c) Slide speed control
d) High speed
e) Turbo mode
Pre-filter replacement
⚠️ Caution: Always disconnect power to the unit before servicing
- First, make sure all power to the unit is shut off.
- Remove the front cover of the main unit by grabbing both sides of about 1/3 of the distance from the bottom and pulling the bottom part away from the main body of the unit.
- When the bottom of the front cover is a few inches away from the main body, use both hands to pull the front cover down slowly to disable the child lock on top of the front cover.
- The pre-filter is locked into the front cover. Use one hand to hold the front cover frame. Use one finger to grab the small ring and pull out the integrated pre-filter. Clean as necessary.
- After pulling out the integrated mesh cover, you will see the replaceable VOC pre-filter laying underneath. Replace as necessary.
Main filter & VOC post-filter replacement
⚠️ Caution: Always disconnect power to the unit before servicing
- Remove the front cover of the unit.
- Turn the safety lock on the high-energy grid from vertical to horizontal, gently pull out the high-energy grid and put it aside on a secure, clean, and dry surface.
- Gently pull out the main filter and VOC post-filter cartridge.
- Unwrap the plastic on both of your new filters prior to reinstalling them.
- Reinstall the main filter and VOC post-filter cartridge. Make sure the VOC post-filter is facing inside (toward the motor/fan). The main filter must go all the way back in the inner housing toward the fan.
- To reinstall the high-energy grid. Make sure the grid and safety lock are facing out towards the front of the unit (towards the cover). The safety lock needs to be on top.
- Turn the lever from horizontal to vertical to lock the high-energy grid in place.
- Put the pre-filter back on the inside of the door and secure the integrated mesh to hold it into place. There are 10 contact points that you will want to make sure are securely locked in place.
- Lastly, put your door back on making sure that the upper tabs at the top of the unit go in first. If done so correctly everything should lock into place.
Reset respective indicators after replacing/cleaning filters.
⚠️ Caution: Always disconnect power to the unit before servicing
- Reset pre-filter indicator: Hold filter 1/VOC pre-filter indicator for at least 5 seconds to reset the timer.
- Reset main filter indicator: Hold filter 2/main filter indicator for at least 5 seconds to reset the timer.
- Reset VOC post-filter indicator: Hold filter 3/VOC post-filter indicator for at least 5 seconds to reset the timer.
- Reset DFS indicator: Touch the DFS indicator button to turn DFS on or off.
Note: When the indicator is reset, the respective red light will go out and the indicator will return to normal (illuminated in white).
⚠️ Caution: Always disconnect power to the unit before servicing
- Filters need to be replaced and maintained properly to maximize the unit’s performance.
- The maintenance schedule is based on the pollution level. The following maintenance schedule is recommended for most environments.
- Filters need to be replaced/cleaned more often if the unit is being used in a heavily polluted environment.
Replacement schedule -
- Main filter - Replace every 9-12 months
- Pre-filter - Replace every 6 - 12 months
- Post-filter - Replace every 6 - 12 months
Cleaning schedule -
- High Energy Grid - Clean every 3 months with a lint-free cloth
- Pre-filter - Every 3 months, gently use a vacuum wand to remove build-up
PureCare by Air Intellipure - for Ultrafine 468s
Under PureCare, Air Intellipure's annual maintenance program, our Technical Support team will thoroughly inspect and clean your Ultrafine 468 on a quarterly basis and replace your filters (pre-, main, and post-) once within the year, to ensure your unit is always operating at its highest level of efficiency. Enjoy peace of mind that you are always breathing the cleanest, healthiest air possible, in your home or office.
Call us at 0908 895 7873 (mobile/Viber) to sign up for our PureCare program.